
The following is a guest blog from long-time Finale user, Composer, Pianist, Producer, and Educator Ryan Cohan.
Having Finale setup for the way you work and how your scores/parts need to appear is vital for working efficiently and rapidly with the program. For musicians, like myself, dividing their time between the performing demands of their instrument and writing for a wide range of ensemble types and sizes, maintaining fluidity with Finale’s depth of notational and publishing possibilities can be challenging.
Here are some key ways to develop and maintain a productive workflow in Finale along with a handful of time saving shortcuts.
Customize Your Libraries
Save a consistent and comprehensive set of chords, score expressions, articulations and text repeats that appear to your specification, and clear out the unused items. These are the types of considerations to address when customizing your libraries:
- How do you want your chord symbols to look?
- Do they all have a uniform appearance?
- Are there chords, expressions, articulations and text repeats you don’t need that can be deleted?
- Are your articulations in the font you want?
- Are there score expressions you regularly need that should be created so they are always ready to go?
- Are your coda markings sized to your liking?
During this process, include any repositioning of the default placement of these items on the score and parts, as well. Not having to move them around the page later will save loads of time.
Setting up Metatools (keyboard shortcuts) and saving them with these libraries is also beneficial at this stage. Metatools can be assigned to most items in Finale such as individual score expressions, articulations, time signatures, smart shapes, staff styles, clefs and many others. This allows for blazingly fast placement of them on the page.
I find having Finale’s Tools assigned to the function keys on my keyboard very convenient for navigating the program rather than mousing around.
Check out Finale’s manual for further details on creating Metatools and saving customized libraries. Several online resources are also available on this topic including Jason Loffredo’s Conquering Finale tutorial series. Darcy James Argue has an excellent article on creating consistent sets of chord symbols, as well.
Utilize Templates
Once you have your libraries saved, building and using templates designed with them and your page layout preferences will allow you to work swiftly and stay in a creative flow.
I rely on two types of customized templates:
- a Default Document that opens as a new file
- a predesigned score saved in my Document Styles Folder for use with the Setup Wizard
The Default Document I created is a single-staff, 2-page file that I use for lead sheets for my ensembles and sketching ideas that I can later copy/paste into a larger score. It is preset with the number of measures per page I need, my measure numbering preferences and inserts for Title, Composer, Copyright, Page Number and Score Name – all with my font preferences.
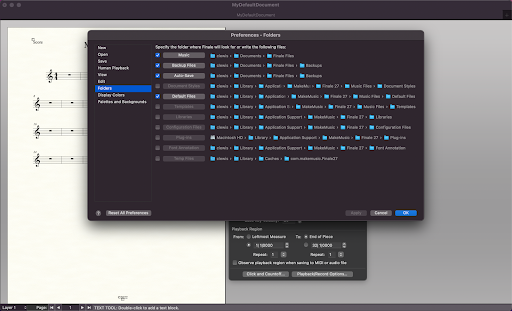
To set Finale to use your saved file as your Default Document, first save the document you want to use as your default, then follow these paths:
- Choose Finale > Preferences > Folders
- Check the Default Files checkbox, if it is unchecked
- Choose the saved file’s location
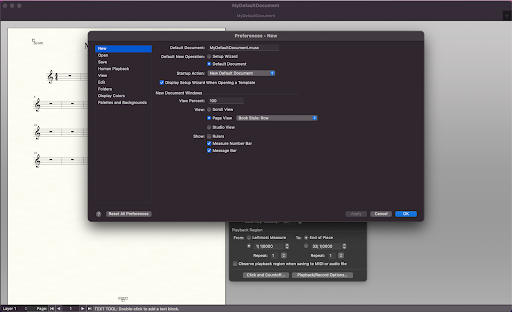
- Next Choose Finale > Preferences > New
- Under Default New Operation, select Default Document
- Enter file name you want to use in the Default Document text box (don’t forget to include the file extension)
Typing ⌘N (Windows: CTRL+N) will now open the Default Document you created. Via Preferences, it can also be set to open automatically when you launch Finale.
The other template I use is a customized score saved in Finale’s Document Styles folder. Placing a score in this folder allows for that file’s layout/appearance to be the basis for any score created using the Setup Wizard. For composers/arrangers regularly working with different ensemble sizes and instruments, being able to swiftly and easily configure a score with any instrumentation built in your own template is critical.
Some features of my score template include customized staff sizes, measure number layouts for score and parts, page layouts, staff styles, spacing for score and parts, score and part name appearances, my document options preference among many others.
The Document Styles Folder is located at: /Library/Application Support/MakeMusic/Finale [version]/Music Files/
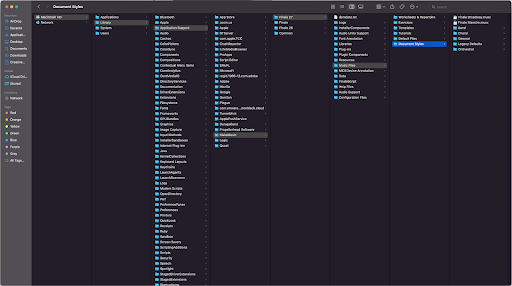
You can save multiple files in this location for use as templates. Choosing which template to use can be done under Select a Document Style, when creating a new file with the Setup Wizard.
Remember, customizing your libraries and templates is always a work-in-progress. As you refine your libraries and page setups over the course of new projects, you can easily update your templates to reflect these changes by overwriting the previous template files. You don’t have to get every detail setup initially; it’s a cumulative process over time.
These setup components may be daunting at first for some – particularly composer/performers not working with Finale on a regular basis. There is an initial time investment required in organizing all these details. However, that time will be returned exponentially in productivity and the ability to focus on musical matters rather than the recurring notional housekeeping that arises from libraries and templates not being properly set up from the start.
Shortcuts, Plug-ins, and Keyboard Maestro
Becoming fluid with Finale means employing keyboard shortcuts for frequently used single and multi-step program actions. These can be in the form of assignable Metatools (mentioned above) or other programmable triggers. Avoiding having to go through multiple menus for repeating tasks is the goal.
There are loads of incredibly useful plug-ins available beyond the ones that ship with Finale (many free) that augment the program’s notational and publishing tools as well as provide additional streamlining functionality. You can visit the websites of these plug-ins developers such as JW Plug-ins, TGTools, Finale Lua, Patterson Plug-ins to learn about what they offer and how they work.
A small sample of my go-to plug-ins:
- Align/Move Dynamics (TG Tools): horizontally aligns score expressions and hairpins
- Easy Tremolos (TG Tools): instantly creates tremolos for designated pitches
- Easy Harmonics (TG Tools): instantly creates harmonics (pitch and node)
- JW Change: change most notational elements via a single dialog box
- JW Copy Part Layout: copies one part layout to another after extracting parts from a score
- JW Tie/Untie Notes: creates/removes ties for all repeated notes in adjacent measures
- JW Rhythm Copy: copies a rhythmic pattern from one selected part to a destination(s) without altering the destination pitches
- Resize Noteheads: changes note size of any specific note(s) within a chord
- Patterson Parenthesis Trill-To Note: creates a reduced size trill-to note
- Chord Line – Keep Top/Bottom Note (Finale Lua): keeps the top/bottom note of every chord, deletes the other notes
The common thread to working as simply and effectively as possible with Finale’s vast music publishing possibilities is distilling complex notational processes to single actions.
To that end, Keyboard Maestro is a third-party software tool that facilitates labor-saving workflows not possible otherwise. Keyboard Maestro allows for the automation of virtually any single or multi-step task in Finale (or other app and system function). It’s easy to use once you get the hang of it, and the time it saves can make it an indispensable part of your setup when you do.
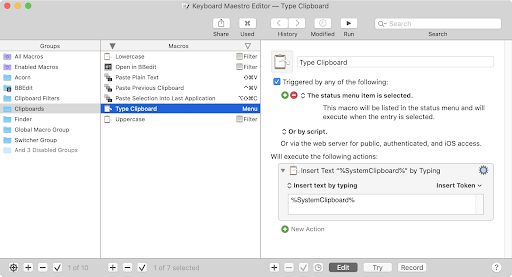
Any Finale menu item, mouse click, data entry, scrolling and dragging – individually and in any combination – can be assigned to any trigger such as a keystroke, MIDI note and MIDI controller. I have keystrokes set up to trigger all kinds of menu items not programmable otherwise, including all the plug-ins I mentioned above.
A couple examples of how I use Keyboard Maestro with Finale…
- ‘Edit Filter…’ and ‘Clear Selected Items…’ are actions I regularly use. I’m constantly opening their respective menus and clicking different checkboxes for items I need to filter or clear; it’s a tedious, multi-step process every time. Using Keyboard Maestro, I created a single keystroke shortcut that will instantaneously open the menu item, check/uncheck the various score item(s) I want to filter or clear and then exit the window. Huge time saver.
- Often, I will want to supply various rhythmic cues notated on a drum part (or others) above the staff with reduced-sized noteheads on the same specific pitch above the staff without ledger lines in another layer on top of their notated part. Those specifications require many menu selections, keystrokes, window navigation and data entry. After programming all the steps as a Keyboard Maestro macro, notating these cues can now be executed with a single keystroke.
Keyboard Maestro’s depth and power extend WAY beyond these particular examples, but hopefully they give a glimpse of how the program could help your Finale work.
Furthermore, there are various ways to trigger your customized shortcuts. Using a mouse or other input device can be very handy – especially for most often used program features or navigation. I have my trackball buttons set up to increase/decrease score size, switch between Speedy Entry and Selection Tools and change layers. A trackpad can trigger even more shortcuts depending on where you touch it, number of fingers used, various gestures, etc. to maneuver Finale without scrolling around or using the keyboard.
As the number of keystroke shortcuts you routinely use add up, adopting a controller such as Elgato Stream Deck or an iPad with the Metagrid app to manage and execute them can be helpful. In essence, they provide labeled touch screen buttons to trigger your Finale and Keyboard Maestro shortcuts/macros so you don’t have to remember them all.
Ultimately, all these software tools are intended to serve your creativity and productivity. As you explore new and better ways to work with Finale, take on a pace that suits you and that does not interfere with those priorities. That capacity will naturally increase as you become more accustomed to the workflow and the potential of these extremely powerful features.