Do you use both Finale and a digital audio workstation (or DAW)? Or do use one and collaborate with people using the other? Either way, I think the three most common ways of using Finale and a DAW together are:
- Creating tracks in a DAW, then exporting MIDI to create charts for performance
- Using Rewire to run a DAW and Finale simultaneously
- Creating some (or all) of a performance in Finale, then exporting Finale MIDI data into a DAW.
At Arranger For Hire we start all of our projects in Finale because our customers require notation. Because they also expect high-quality first-demos of our arrangements, we use the Garritan sounds included with Finale (called Garritan Instruments for Finale, or GIFF) in creating these demos. We find these sounds to be more than adequate for most customers who wish to audition their commissioned score.
Occasionally our customers need to continue their production in a DAW. This can provide them with greater options and flexibility in the choice of sounds, libraries, and effects. Working with these customers, we’ve learned that beginning projects in Finale – and leveraging Finale’s Human Playback feature (or HP) – has some very real benefits. As its name implies, Human Playback can produce fairly realistic performances without the need to spend hours of manually editing continuous controller (or CC) data.
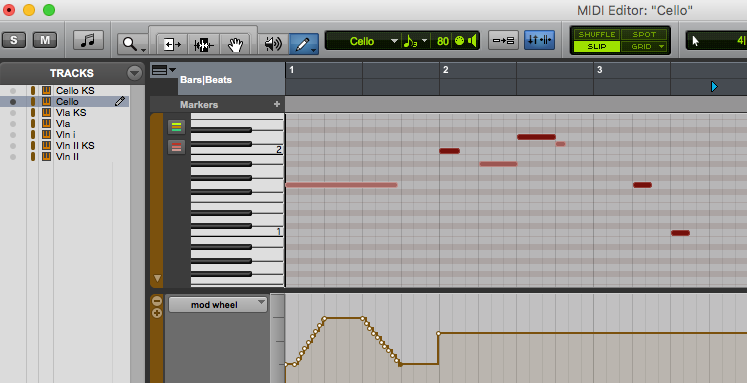
In the screenshot above, you can see the automation created by HP, as it interprets hairpins in the score.
In this post, I’ll follow the third path listed above. I’ll share my experiences with the process, and identify some of the details that HP imparts on the MIDI data.
Human Playback – A Great Leap Forward
Early versions of Finale relied on Finale’s MIDI Tool to edit CC and other data. While this tool still remains in the software, it’s a bit antiquated and kludgy. Modern versions of Finale leverage HP (as mentioned above) to interpret score markings automatically, “under the hood.”
HP uses key switches as a means of switching samples in a particular instrument during playback. One example would be to switch string sounds from arco to pizzicato. Robert Piechaud and the good folks of MakeMusic have invested considerable resources in this more intuitive approach, and they’ve done an excellent job.
What Human Playback Data is Exported by Finale?
Let’s examine an exported Finale MIDI file (a small string section score) as seen in ProTools. I entered only a few markings, just to see how they show up in the data. There are three different sets of samples for each instrument, swapped via key switch: tremolo, legato, and pizzicato. Here’s what the example sounds like:
The Tracks
We should start here with a cautionary note. Finale will probably export KS signals in another MIDI track with a similar name. I say “probably,” because Finale didn’t separate KS data for my Violin I track – it was included in a single track. MakeMusic is aware of this issue, and its cause, and plans to address it soon.
The example score instrumentation is
- Violin I
- Violin II
- Viola
- Cello
The MIDI tracks created by Finale’s Export MIDI feature from this score are:
- Violin I-01 (all data)
- Violin II-02 (KS)
- Violin II-03 (all other MIDI)
- Viola-02 (KS)
- Viola-04 (all other MIDI)
- Cello-02 (KS)
- Cello-04 (all other MIDI)
It’s not quite as simple as just opening it and having it work right out of the box. You need to route the KS track to the same channel on the player as its instrument. You must either do this or merge the MIDI data if you want to hear your KS articulations and techniques work in a DAW with the ARIA Player. Once you’re this far, you’re where you left off in Finale – it sounds the same as Finale output.
The Data
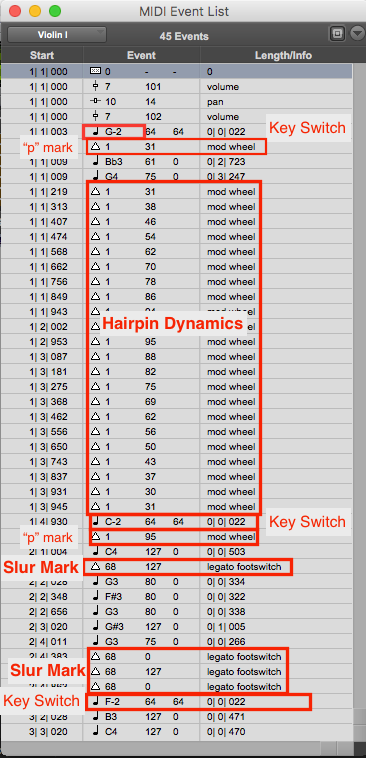
You can immediately see there’s data to work with: the image above shows all the exported MIDI data in Violin I. Human Playback can export a lot of CC data, and you can add your own either in Finale or the DAW. For a complete listing of all controllers for all Garritan instruments, see the user manual topic Garritan Instruments for Finale instrument details.
This data is automatically routed correctly in the ARIA Player by default (with the likely exception of KS, as mentioned above), and you can add more automation lanes or record more controller data for all the accepted parameters from within your DAW. To learn what all these different possible controllers do in detail, consult the Finale Garritan Human Playback Reference.
Using other players and libraries, you can route this data to the correct control in your virtual instrument, harnessing Finale’s intuitive CC data to retain playback of your score markings in any library you wish to use.
Using Aria Player in a DAW
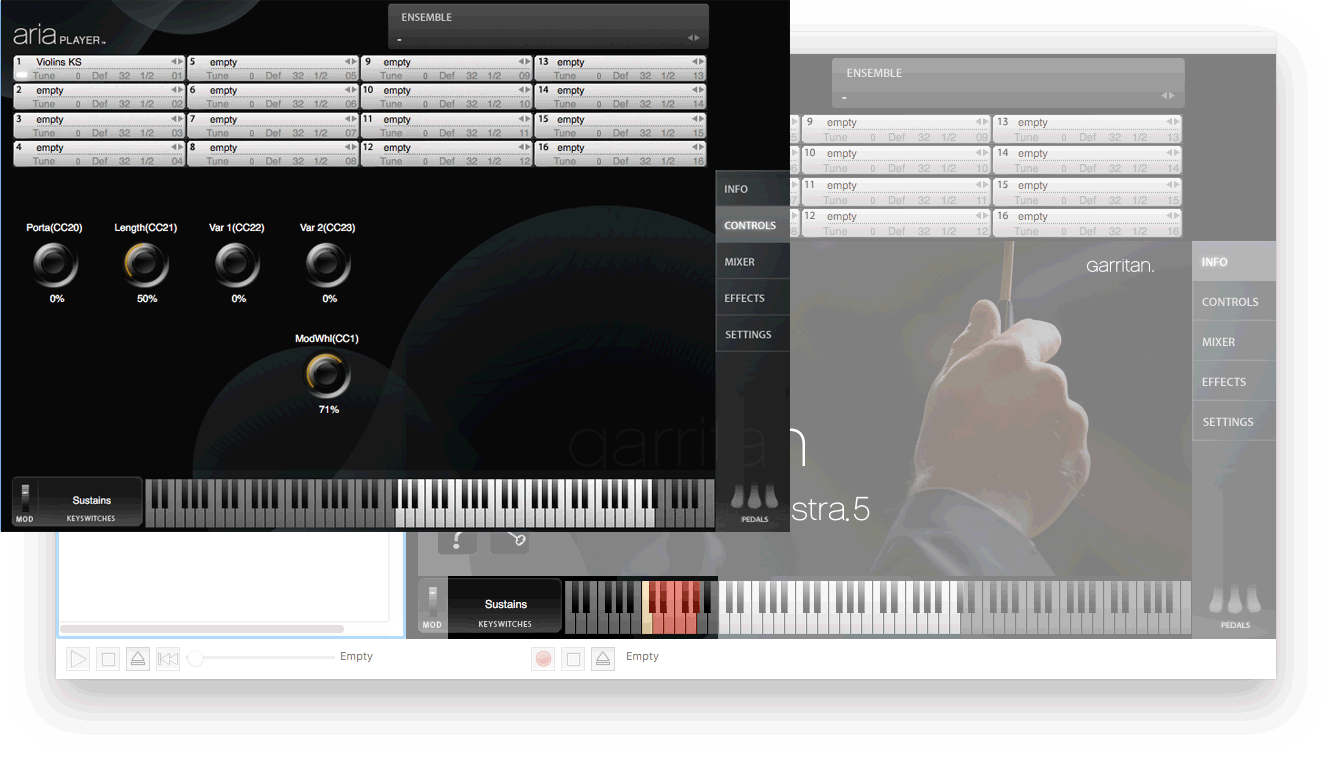
Finale ships with the Garritan ARIA Player. All of the KS and CC data that work in Finale work with ARIA in a DAW, but with more controller options available. Garritan Instruments for Finale has minor limitations in the ARIA Player compared to premium Garritan libraries such as Personal Orchestra or Jazz & Big Band. The foreground image shows ARIA loaded with GIFF. The picture behind shows it loaded with Personal Orchestra – note the coloration of the keys for the key switches in PO, but not GIFF.
 It’s possible to identify the KS in the ARIA Player interface in the premium libraries, but not so in GIFF (they’re listed in Finale’s online manual).
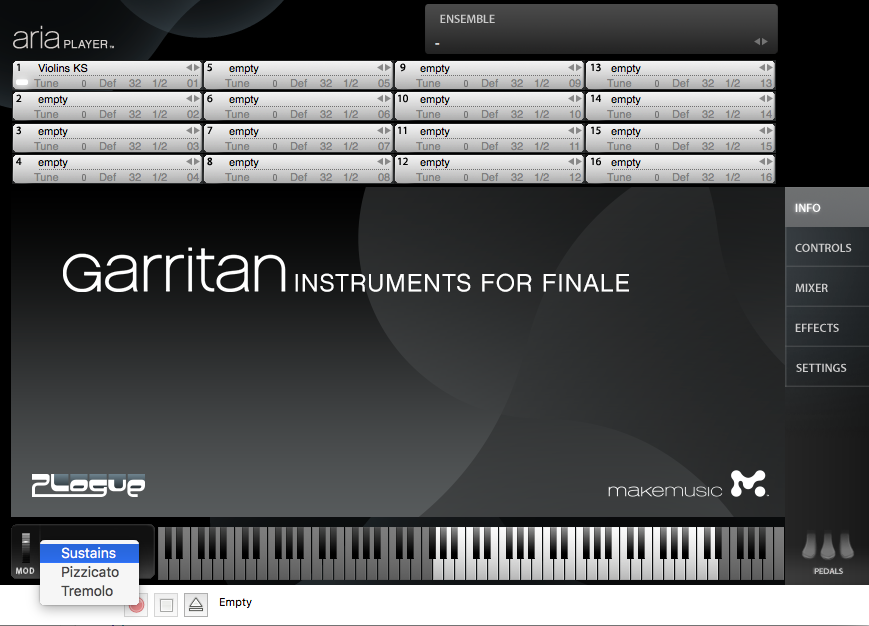
The available KS sounds show in a popup menu. In playback, they’re controlled by MIDI pitches “under the hood.” KS can be user-selectable via popup if you’re using it in standalone mode for live performance.
Garritan’s premium libraries offer more samples for most instruments, emulating most common sound variants, articulations, and performance techniques for every instrument in the library.
Setting up ARIA Player in a DAW
“Should I use a Player for each track, or one Player as a multi?”
If you’re concerned about memory usage in your DAW, instantiate the ARIA Player on a single track, with each instrument assigned to one of ARIA’s 16 slots. This configuration is referred to as a “Multi” (multi-channel instrument). Import the MIDI data in your DAW, assign it to multiple MIDI or instrument tracks, and route the MIDI data to the corresponding MIDI channel for the assigned instrument. Also, you’ll want to assign your separated KS tracks if necessary.
If the session is small enough that memory isn’t an issue, adding a separate instance of ARIA Player to each instrument track gives you all of your correctly-routed Finale data, the ability to edit the MIDI if needed for better legato or changes in automation curves, and the ability to apply your favorite dynamics and effects plug-ins.
Set up and Save Multis
Save multis you create for use in other projects if you think you’ll need them again. You can do this either in the plug-in or in “standalone” mode (opening ARIA Player as an app on your computer). ARIA will put it in the correct location for recall by default into the com.Plogue.Aria folder. (It must be saved in this location or it won’t show in the ARIA Player’s “Ensembles” menu).
Using Finale’s Human Playback with Other Player Plug-ins
With a little editing, Finale’s data can be used with other players such as Native Instrument’s Kontakt, Avid’s Expand, EastWest’s Play, and others. The biggest difference from library to library will be the key switched alternative sounds available, the keys used to trigger them, and routing of the CC data. The CC data can be routed to the appropriate control in whichever player you’re using. Any DAW allows the creation of multiple automation “lanes,” which are sub-tracks to accommodate CC data. Assign any lane to any controller (for more info, please consult the DAW’s manual on automation editing).
Using Finale’s MIDI with another plug-in may require either editing of the KS in the MIDI file, or changing the assignments in the library you’re going to use. Kontakt’s Group editor allows the assignment of new triggers to KS samples. You could edit Finale KS MIDI in the DAW, either changing the KS pitches in the MIDI list, or adding the pitch for the other sampler you’re using. If you’re routing to more than one sampler, that’s the way to go, as Kontakt’s KS triggers are different and two octaves higher, though they’re not likely to conflict unless it’s a patch with a whole lot of KS. (For more info, please consult the DAW’s manual on MIDI editing.)
Final Thoughts
I created this video to demonstrate the process of importing Human Playback data into a Pro Tools session :
The people at MakeMusic have invested a lot of time and energy developing Human Playback. There’s so much useful performance data exported with Finale MIDI files, it often makes sense to start any project in Finale. It’ll save a lot of editing later.
 Jon Burr is a composer, arranger, producer, recording engineer, bandleader, bassist, and educator from Yonkers, NY and a Finale user since 1996. As owner/operator of Arranger for Hire, he serves music arranging and production customers from around the world. A veteran touring bassist, his performance credits include Tony Bennett, Buddy Rich, Stan Getz, Chet Baker, Eartha Kitt, Rita Moreno, The Hot Swing Trio, Stephane Grappelli and many others. Arranging customers have included the Mel Lewis Jazz Orchestra, Chilean Astronomy Society, The Milpitas Community Concert Band, The Honey Taps, The Montclair Kimberly Academy’s annual musical, and many others. He writes for and leads his own ensembles, including the Jon Burr Quintet. His arrangements for Swedish YouTube artist Kim Andersson have received over 5 million Facebook views.