
This post was submitted by Finale user Taran Plamondon. Have an idea that you would like to see featured on the Finale blog? Submit it here.
If your creative process is as chaotic as mine, then you’ve probably emerged from a compositional frenzy with a first draft that looks like this:
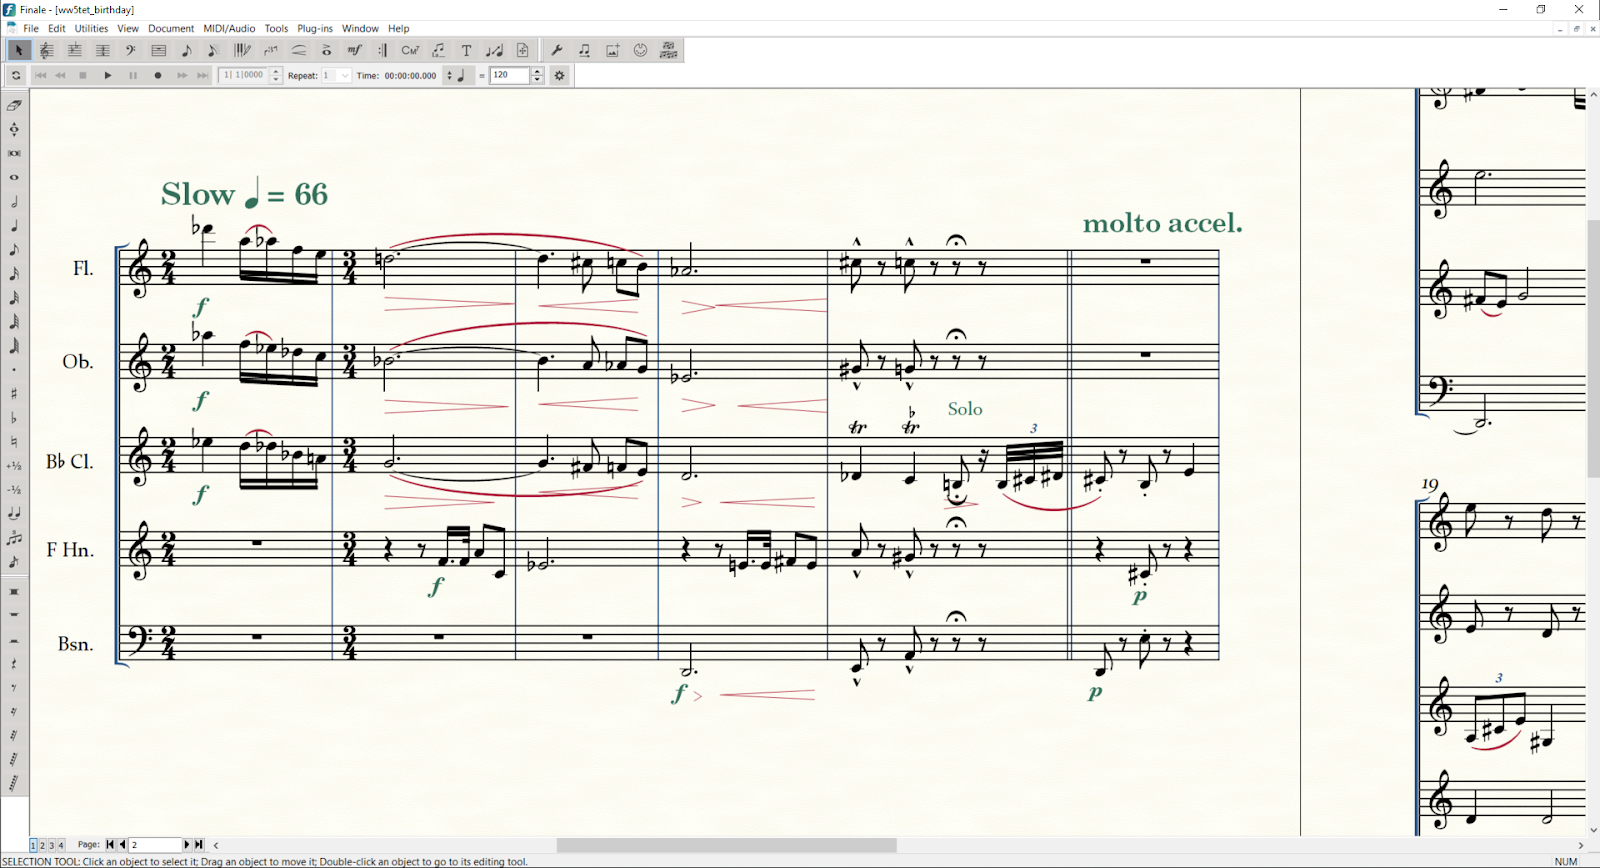
I always wind up with dynamic markings all over the place. Even with the introduction of beat-attached Smart Shapes in Finale 2014, cleaning up & aligning dynamics is still a big part of my workflow. In my beginner days (a decade ago!) I would meticulously click and drag everything into place, one by one. That’s no way to live!!
Here are three tricks I’ve figured out over the years to make aligning dynamics as painless as possible:
1. Aligning Dynamics Vertically
My philosophy when preparing a score is that every single marking on the page should be intentional. In my example above, the top three staves are playing together as a unit, but the dynamics don’t reflect that. Within the mismatched hairpins lies the implicit statement that each line should be played slightly differently. This not only runs contrary to the intention of the composer, but adds unnecessary complexity to an otherwise straightforward passage.
It’s in our best interest to align these dynamics vertically. This is easily done by selecting a column of hairpins that you want to align, then right-clicking (Ctrl+Click on a Mac) on the handle of whichever hairpin you want the others to match. In this case I like the length of the middle one:
Nice and simple. You may have noticed you can do the same for a row of hairpins using the “Align Horizontally” option. This comes with one major limitation: these Align functions only apply to Smart Shapes, so your dynamic markings will stay put.
This is why I like to use the TGTools Plug-in “Align/Move Dynamics” to align horizontally. It’s very easy to use on its own, but I will show you how to turbo-charge it in tip #3, so stick around!
2. Using Filters to Selectively Copy & Paste
Finale has very powerful filters, which can bring your workflow to the next level if you know how to use them. In this case, I find them most useful in phrases where multiple instruments have identical dynamics, like our scenario. It can also be very useful if you like to add more dynamics later.
You can open the Edit Filter in the Edit menu, or use the keyboard shortcut ‘Shift+Ctrl+Alt+F’ (‘Shift+Cmnd+Opt+F’ for Mac users). These check boxes represent everything that is carried over in a copy-paste operation.
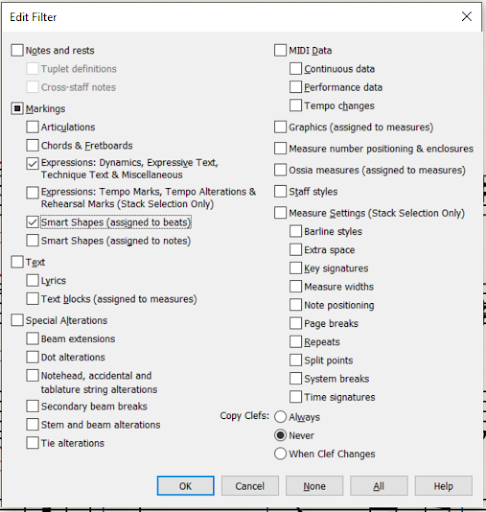
By default, everything is selected, so click on the “None” button to deselect everything. We only want “Expressions: Dynamics, etc.” and “Smart Shapes (assigned to beats).
Now that our filter is set, we can turn it on or off in the Edit menu with the “Use Filter” button. I save some time by toggling Use Filter with the keyboard shortcut Alt+Ctrl+F (Opt+Cmnd+F).
I have spent a bit of time adjusting the length of the hairpins on the top staff (Flute), and I used TGTools Align/Move Dynamics to horizontally align everything. Now I can select this phrase, copy it (Ctrl+C/Cmnd+C), and then paste it (Ctrl+V/Cmnd+V) onto the other two staves.
This can save you a lot of time and make your scores look much cleaner, but it has its limitations. Take a look at the clarinet part in the previous example; when we pasted the dynamics from the flute part, they retained their vertical positioning, colliding with the slur. They just need to be nudged downwards a little bit with the TGTools plug-in.
3. Using Hotkey Scripts + TGTools Align/Move Dynamics
You’ve probably noticed that I’ve mentioned the TGTools plug-in four times already in this article. That’s because it’s extremely useful and routinely saves me a lot of time, particularly thanks to my hotkeys which allow me to use it without even clicking on it!
There are a lot of ways to set up hotkeys, and they can truly be as complex or as simple as you want them to be. For this scenario I am going to use AutoHotkey for Windows because it’s free and easy to learn.
(For those on team Apple, I’d suggest Keyboard Maestro, which is a popular and user-friendly equivalent. I apologize that this next section is primarily for my fellow PC users, since adapting these hotkeys for Mac iOS is a bit out of my depth.)
Once you have AutoHotkey installed on your computer, creating a hotkey script is as easy as right clicking in a folder and selecting “New>AutoHotkey Script.” I have a bunch of my favourite scripts in a convenient folder for quick access, and occasionally I will create a project-specific script which I will store with its associated Finale files.
Right-click on the file, and open it with Notepad to edit it. We want to build a script which accomplishes four things in a single keystroke:
- Open TGTools Align/Move Dynamics,
- adjust the “Move Vertically” value,
- press “Go” to activate the plug-in,
- then close the plug-in.
The AutoHotkey documentation is very accessible, but for brevity’s sake, please feel free to steal my script:
]::

Send, !i{Up}{Right}{Enter}{Tab 8}8{Enter}!c

return

'::

Send, !i{Up}{Right}{Enter}{Tab 8}-8{Enter}!c

return

[::

Send, !i{Up}{Right}{Enter}{Tab 8}16{Enter}!c

return

`;::

Send, !i{Up}{Right}{Enter}{Tab 8}-16{Enter}!c

Return
It’s simpler than it looks. It’s essentially four identical operations, each activated with a different keystroke, which enter different values into the TGTools plug-in. Here’s a breakdown of how it works:
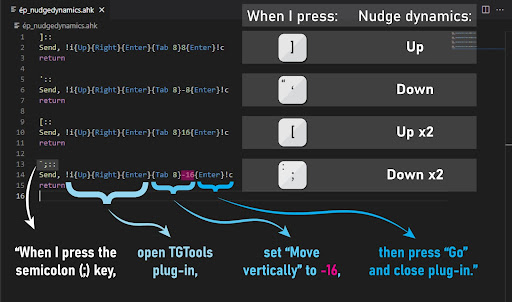
Before you start using it, you will need to change the “Move vertically” values based on your preferred Measurement Units in Finale. There is one of these values for each keystroke; they are the only digits which are not surrounded by a curly bracket (I’ve highlighted the last one in pink).
You can view and change which Measurement Unit is used by default in Finale under “Edit>Preferences>Edit>Measurement Units.” Mine is set to EVPUs; I like 8 EVPUs as a nice “nudging” distance, but you could set yours higher (for faster nudging) or lower (for more precise increments) depending on preference.
For reference, 8 EVPUs is equal to 2 Points, ⅓ of a Space, 0.7 Centimetres, or 0.027 Inches. So for example, if my preferred Measurement Unit were Spaces, I would swap the 8 in the script with 0.33, the 16 with 0.66, and similarly for the negative values:

With that little bit of math complete, we can now save the script, close Notepad, and activate it by double-clicking on the file.
With our script active, select a musical passage in Finale and press any of our four hotkeys to nudge dynamics up or down. The TGTools plug-in dialog will likely flash onto your screen for a second, and your dynamics will be automatically aligned & nudged in the corresponding direction.
This is for fine tuning, so don’t mash the hotkeys! I find this script works best when you give Finale a half-second between key presses to think. After all, each hotkey stroke is actually around 20 individual keystrokes for Finale to process all at once.
Feel free to experiment with it to taste by changing the nudge values or even adding more hotkeys. I recommend selecting the “Align>To Average Distance” radio button in the TGTools plugin. Your selection here is retained since our script doesn’t touch this part of the dialog box.

Finally,make sure to deactivate the script when you are done using it; right-click on the AutoHotkey icon in your computer’s taskbar and select “Exit.”
With these three tricks, I’ve saved myself countless hours of tedious tweaking, and my scores look much cleaner. I hope it helps you too! Make sure to offer a great big danke schön to Tobias Giesen, whose excellent TGTools plugins make the hotkey script trick possible.