
Ver artículo en español
Like most complex computer programs, Finale is best learned when the user can comprehend the logic and organization of the program. Once you start grasping these core concepts, the learning curve will be severely flattened. Since I started developing my tutorial series called Conquering Finale and teaching Finale directly to students, I have discovered some key insights about how and why students often miss some of these core concepts while attempting to learn the program on their own.
As a teacher of Finale, my ultimate goal is not to teach my students how to do every single thing in Finale, but rather to teach them how to figure things out on their own. That, to me, is true mastery! Reading through every menu, adopting a tools-based mindset for organization, researching faster ways to accomplish tasks, using the metatools, and tapping into readily-available resources are just a handful of ways to familiarize yourself with the ins and outs of Finale. So with that in mind, here are five tips that I believe will help you grasp some of Finale’s logic and also help you help yourself learn Finale.
1. Read all of the options
I can’t take full credit for this one. Emily Grishman, the great New York City Theater Copyist, talks about how when she first learned Finale, she spent a ton of time simply clicking on every menu and reading, one by one, every single item in every single menu. Then she read every item in all of the submenus, as well. After that, she started opening windows and read all of the items available in those windows. She did all of this before she even entered a note in Finale. Although I wondered how long it took her to do that, it’s a brilliant strategy for learning Finale, not to mention any other computer program.
The idea behind this is that you’re giving yourself an overview of the whole program: looking at the forest before you start looking at the trees. If you’re brand new to Finale, you will likely not understand half of what you’re reading, but the idea is that you’re giving your brain a roadmap as to where to find things. You will eventually come to a point where you need to do a specific task and you may recall seeing something related to that task in one of the menus or windows. You’ll search around, find what you’re looking for, and begin exploring what it does. If you don’t read everything first, you may not even think to look!
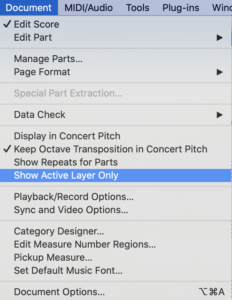
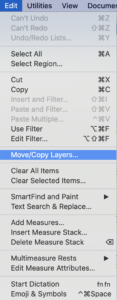
A couple of important items that my students often overlook are the “Show Active Layer Only” option (Document Menu) and the “Move/Copy Layers…” option (Edit Menu). When you first open Finale and see those items, they will likely have no meaning to you, but once you start learning more about Layers, just knowing that those options exist, as well as exploring what they can do is going to give you a significant advantage.
Read the options!
2. Think like Finale thinks
Computers don’t think like musicians. But musicians also don’t think like computers. The interface between the two has always been the pot of gold at the end of the rainbow for any notation program. Finale’s logic and organization allow for it to be a very streamlined computer program. But it’s still just that—a computer program.
As musicians, we tend to categorize items by their musical function. Dynamics, for example, would include mezzo-forte markings, as well as hairpins. But Finale, which takes a tools-based approach to organization, puts those related items in separate tools. Meanwhile, an accent, a fermata, a mordent, and harmonics all exist within the Articulation Tool even though those items are an articulation, a pause, an ornament, and a playing technique respectively. So what gives?
Finale categorizes items by how they attach to the page, the measure, or the notes, not by how we would categorize them musically. Dynamics, tempo markings, rehearsal markings, technique texts, etc., are all lumped together in the Expression Tool because of how they attach to a single point in a measure. And slurs, hairpins, octave lines, glissandi, etc. are all part of the Smart Shape Tool because they are all extendable shapes that start at one point in a measure (or on a note) and end at another. A fermata, an accent, and a mordent share a similar trait in that they all get attached to a single note or chord. It can be confusing because fermatas, accents, and mordents exist in what Finale calls the Articulation Tool, even though they’re not all (musically speaking) articulations. (Perhaps the “Items That Attach To a Single Note, Chord or Rest Tool” would have been a bit too cumbersome in the user interface.)
When you start to get a little deeper into the program, recognizing that Finale breaks things into individual and immutable “Frames” (a single measure within a single staff), will be important when you need to do things that break the normal mold of notation. Ultimately, you can’t fight the Frames. However, recognizing what can be done to the Frames to make them appear as something other than a constant grid of horizontal staves and vertical measures will allow you to create any type of non-standard notation you can think of.
Essentially, Finale’s logic is to group things in a way that’s easier to organize in the programming code. It can be tricky to find your way into that logic but ultimately it’s that organization that allows Finale to do more with fewer options and windows. So, don’t fight it; embrace it! Once you do, the sky’s the limit.
3. There’s always another way!
A common phrase that I hear from my students is “Wow, I didn’t know Finale could do that!”
One of the unique features of Finale is that there are often several ways to do the same thing. For example, there are at least 6 different ways to add Articulations in Finale and 5 different ways to change the time signature. There are 3 whole tools (which all have at least two different modes), just for entering notes in Finale.
I’ve discovered that a lot of users will find one way of doing something (or maybe two), and then stop looking. That’s a big mistake. If you stopped after learning one way to flip stems, you may find yourself flipping one stem at a time for a 16-bar passage and that would take forever. There’s another way. Select the 16 bars, go to the Utilities Menu > Stem Direction, and choose Up or Down (or you could reset to the defaults). What might have taken 5 minutes will now take all of 3 seconds.
If you find yourself doing something that seems to take forever, stop. Take the time to research to see if there’s a faster way. Nine times out of ten, there will be. Five or ten minutes of research to improve your efficiency 20-fold is five or ten minutes well spent away from your project.
There’s always another way!
4. Learn the Metatools
Metatools (Mac, Windows) are usually the fastest way to enter anything in Finale and they exist in 8 of Finale’s 26 Tools, even the Key Signature and Time Signature Tools!
Metatools allow you to quickly enter an item from one of Finale’s tools by holding down a key on your keyboard and then clicking, double-clicking, or sometimes click-dragging, depending on the Tool and the context. This bypasses all of the selection dialogue boxes that you would normally see when adding something.
Learning Metatools can be daunting at first because each of the eight tools that take advantage of Metatools has its own set of unique Metatool keystrokes; that’s a lot to learn. But don’t panic— you don’t need to learn all of them. And you can even program your own Metatools that are easier for you to remember if you want. I have three tips to help you get started with Metatools:
Learn how to use them. Metatools are implemented in slightly different ways between the eight tools that can use them, but the principle is usually the same. A letter or number represents an item, sometimes you hold down that key and click or double-click somewhere, or sometimes you select a measure and just press the appropriate key. First and foremost, learn how they work. Eventually, you should learn how to program your own Metatools, as well, because that can be a huge step forward in speeding up your workflow.
You don’t have to memorize them all at once. I would start with the four most commonly used items in each tool. Here’s a good starting place for five of the tools:
- Articulation Tool
- S = Staccato
- A = Accent
- E = Tenuto
- F = Fermata
- Expression Tool
- 4 = f
- 5 = mf
- 6 = mp
- 7 = p
- Clef Tool
- 1 = Treble Clef
- 2 = Alto Clef
- 3 = Tenor Clef
- 4 = Bass Clef
- Smart Shape Tool
- S = Slur
- < = Crescendo Hairpin
- > = Decrescendo Hairpin
- T = Trill
- Staff Tool (For Staff Styles)
- S = Slash Notation
- R = Rhythmic Notation
- O = One-Bar Repeat Notation
- T = Two-Bar Repeat Notation
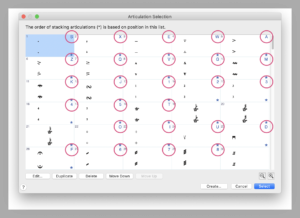
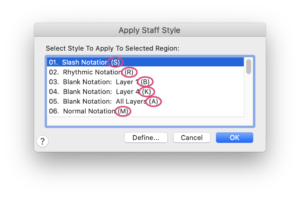
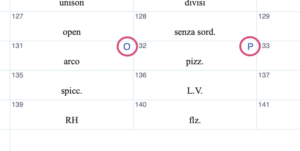
You can always find the Metatool keys so you can learn them as you go. In the Articulation and Expression Tools, they will appear in the Selection Dialogue window. Look in that window for a particular item. When you find it, look in the upper right corner of that item’s box. The letter or number that you see there is the Metatool for that item. In other places, they will be listed in parentheses next to the name of a particular item. In the Staff Styles Selection window, for example, you will see this. Learn them as you go. If you’re writing for strings a lot, you’ll soon realize that the “arco” and “pizz.” technique texts have an “O” and a “P” in the upper-right corner of their respective boxes, so now you can start using those letters as Metatools and save yourself a lot of time entering those common technique instructions.
5. Use the resources available to you
If you have a question about Finale, chances are someone else in the 30+ year history of Finale’s existence also had the same question. Most likely, somewhere on the internet that question was asked and answered, maybe even a dozen times already.
The following are some of the resources available to you:
- Finale Manual (Mac)
- Finale Manual (Windows)
- The Official Finale Forum
- There are (at least) four separate Facebook groups:
- Finale 101
- FINALE Power Users
- Finale Playback Wizardry
- Finale Scripts, Plug-ins, and Macros
- Nick Mazuk has a great YouTube channel called Finale Superuser where he teaches some tips and tricks.
- Or, you could check out my own tutorial site: Conquering Finale!
And don’t forget Google! Google the phrases “Finale Slashes,” “Finale Keyless Score,” and “Finale Enharmonics.” The first results that pop up will be links to the correct pages in the Finale manual for those topics. The Finale manual is enormous. If you don’t quite know the correct terminology, it can be tricky to navigate. Google’s search algorithms are highly intelligent and can interpret wrong spellings, wrong word order, and can even return correct results for incorrect terminology. If you search for “No Key” directly in the Finale manual’s search bar, you won’t find what you’re looking for right away. If you search for “Finale No Key” in Google, the first link will take you to the page for Keyless Score in the Finale manual. Google is your best friend. Use it.
In conclusion, Finale is an incredibly comprehensive program that can do anything you want it to. Don’t be daunted by that, but also don’t try to learn it overnight. Be patient, and take the time to learn it correctly. Hopefully, if you utilize the tips above, you should have some good tools and techniques to help yourself learn Finale faster and more comprehensively. So get to it, and start Conquering Finale!