Today I’m going to quickly create a chord chart with Finale 2014. Don’t own Finale? You can try these same steps in the free trial version.
I’ll start by launching Finale and selecting the Setup Wizard, where I begin by responding to simple questions. I’ll choose an Engraved Style, select the Blank Staff, type in my text including song title and composer, and provide specifics including tempo and starting time and key signatures.
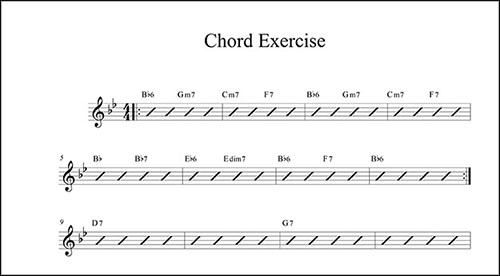
To enter chords into the resulting piece, I’ll select the Chord Tool (its icon looks like a CM7 chord symbol) and click where I’d like to place a chord symbol. Note that even though each measure currently shows a whole rest, I can easily position a chord over any beat, simply by clicking where I’d like it to appear, and I can use the spacebar to advance beat-by-beat. Next I simply type the desired chord name: Bb6, Gm7, F7, Edim7, etc… Finale recognizes common chord suffixes and matches them to great-looking symbols that are automatically linked to playback, transposition, and other functions.
Should Finale not recognize a chord suffix you type, it will let you know, and give you the option to simply adding the text you indicated as a new suffix (without the playback functionality). You can, of course, create full featured chord suffixes from scratch, too. To do this, instead of clicking where you want a chord to appear, double-click for advanced control over chord suffix creation.
If you’re new to Finale, here are two tips:
- Use the Esc key to choose Finale’s Selection Tool
- In the Selection tool you can alter many elements of your music by right-clicking on them (control-click on the Mac). This produces a context menu full of options to choose from.
Try it: Hit the Esc key to choose the selection tool, then right-click (control-click on the Mac) on a clef, a key signature, a measure number, a measure, text, or anything else. The resulting context menu lets you transform the selected item.
Let’s use this trick and some keyboard shortcuts to add chord slashes. Use Ctrl-A (command-A on Mac) to select the whole piece, then right-click the selected region to see the contextual menu, then select Staff Style > Apply Staff Style > Slash Notation and click OK.
Let’s do some formatting, too. While everything is still selected, type Ctrl-M (Shift-Command-M on Mac) to see the Fit Measures controls. Here I might leave the default at “Lock layout with 4 measures per system” and hit OK.
Want to repeat a section? Drag-select the measures you’d like to repeat, right-click on the selected area, and choose Repeats > Create Simple Repeat. Done.
Once I’m familiar with the few steps above, creating a chord chart in this manner is a bit faster than creating one by hand, quite a bit more legible, easy to copy (hit print again), and simple to share whether you prefer PDF files or Finale files that can be read by users of our free Finale NotePad or Finale SongBook iPad app.
The savings in time gets even more pronounced when I want to make changes to my chart, but we’ll cover that in more detail in a future post. Are you using Finale to create chord charts? Have tips to share or questions to ask? Please let us know by clicking on “Comments” below.